
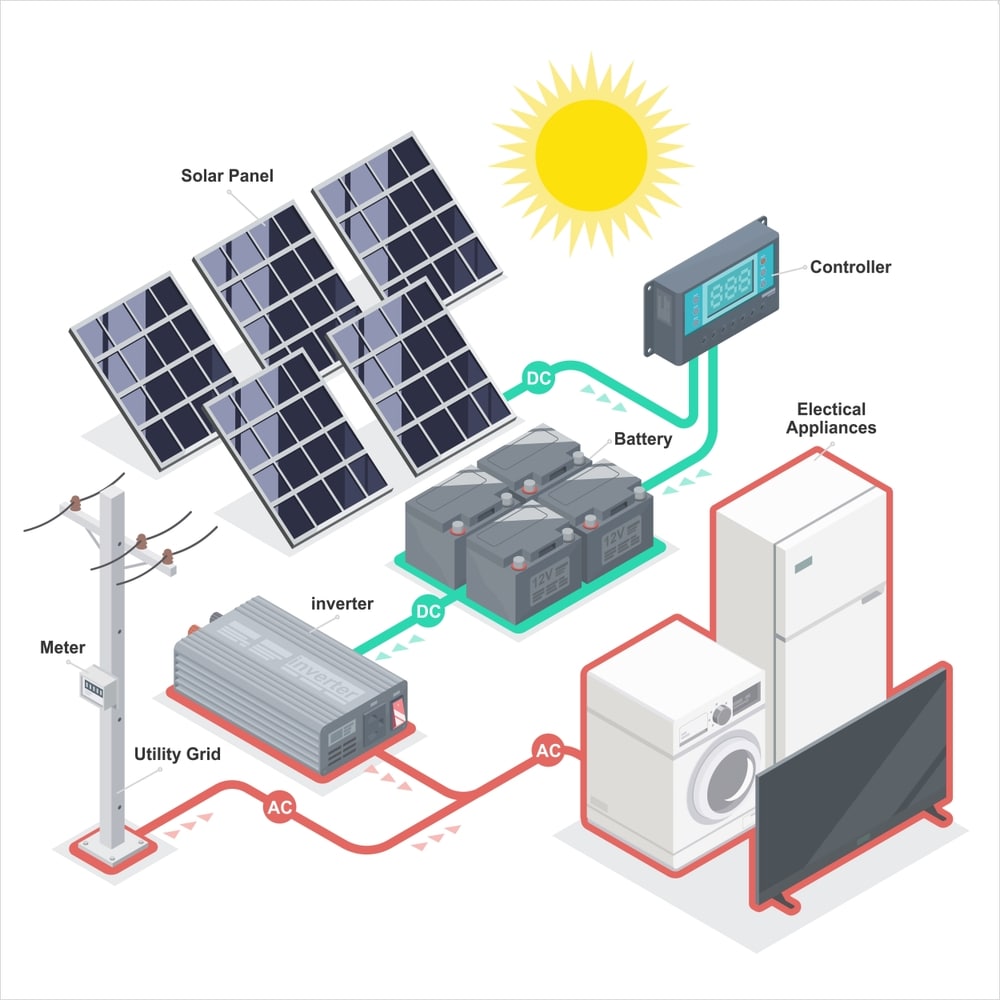
In the realm of solar power systems, a crucial component that ensures efficient energy management is the solar charge controller. This device serves as the bridge between the solar panels and the battery bank, regulating the power, current, and voltage flow. While a single charge controller is typically sufficient for most setups, there are situations where multiple charge controllers become a necessity. But is it practical to employ multiple charge controllers? And if so, how can we connect two solar charge controllers to a single battery bank?
To ensure a seamless integration, the outputs of the two charge controllers must be connected in parallel to the battery bank. This parallel connection guarantees that the overall voltage delivered to the battery bank remains consistent. Furthermore, each charge controller should be connected to separate solar panel arrays, enabling individual regulation and optimal performance. This process can be repeated with as many charge controllers as required, making it a versatile solution.
Connecting multiple charge controllers to a battery bank is not only practical but also highly advantageous in various situations. This article will delve into these scenarios and shed light on the benefits of employing multiple charge controllers in a solar power system. Additionally, we will provide a detailed guide on how to successfully connect two solar charge controllers, empowering you to optimize your solar power setup for enhanced performance and efficiency.
How Do Solar Charge Controllers Work?
Before we dive into the specifics of wiring two solar charge controllers, let’s first understand how these devices function. A solar charge controller, also known as a solar regulator, is an essential component of a solar power system. Its primary role is to regulate the power flow between the solar panels and the battery bank.
A solar charge controller performs two crucial functions:

Overcharge Protection
Solar panels generate electricity in varying intensities throughout the day. To prevent the battery from overcharging and sustaining damage, the charge controller regulates the current flow, ensuring optimal charging without exceeding the battery’s capacity.
Battery Protection
Solar charge controllers also prevent the battery from discharging excess power during low sunlight conditions or at night. By monitoring the battery’s voltage, the controller ensures that power is only drawn from the battery when required, protecting it from deep discharge.
Now that we have a basic understanding of solar charge controllers, let’s move on to the process of wiring two of these devices for an efficient and reliable solar power system.
How to Wire Two Solar Charge Controllers
Wiring two solar charge controllers requires careful planning and precise execution to ensure an effective power management system. By following the step-by-step guide outlined below, you can confidently wire two solar charge controllers for an optimized solar power setup.
Step 1: Assess Your Power Requirements
Before diving into the wiring process, it’s crucial to assess your power requirements and determine the capacity of your solar panels and batteries. This information will guide you in selecting the appropriate solar charge controllers and ensure compatibility with your system.
Step 2: Choose the Right Charge Controllers
Selecting the right solar charge controllers is essential to ensure maximum efficiency and compatibility with your solar power system. Consider the following factors when choosing your charge controllers:
- Voltage and Current Ratings: Ensure that the charge controllers can handle the voltage and current ratings of your solar panels and battery bank.
- Charge Controller Type: Decide between PWM (Pulse-Width Modulation) or MPPT (Maximum Power Point Tracking) charge controllers based on your specific requirements and budget.
Step 3: Understand the Wiring Configuration
To effectively wire two solar charge controllers, you need to understand the wiring configuration that suits your system. Two common configurations are the parallel and series-parallel setups.
- Parallel Configuration: In this setup, the positive terminals of both solar charge controllers are connected to the positive terminal of the battery bank, while the negative terminals are connected in a similar manner. This configuration is suitable when you want to maintain the system voltage while increasing the current capacity.
- Series-Parallel Configuration: This configuration involves connecting the solar charge controllers in series and then connecting the positive and negative terminals to the battery bank. This setup is useful when you want to increase both the voltage and current capacity of your system.
Step 4: Gather the Required Tools and Materials
To successfully wire two solar charge controllers, gather the necessary tools and materials, including:
- Solar charge controllers (2)
- Solar panels
- Battery bank
- Solar panel cables
- Battery cables
- Wire cutters
- Wire strippers
- Crimping tool
- Multimeter
Step 5: Wiring Process
Now that you have all the required tools and materials, let’s proceed with the wiring process. Follow these steps carefully:
- Turn Off Power: Before connecting any wires, ensure that the solar panels and battery bank are disconnected from any power source and turned off to avoid electrical shock.
- Connect Solar Panels: Connect the positive and negative terminals of the solar panels to the input terminals of each charge controller using the appropriate solar panel cables.
- Connect Charge Controllers: Connect the positive and negative terminals of both charge controllers to each other using the series or parallel wiring configuration, as discussed in Step 3.
- Connect Battery Bank: Connect the positive and negative terminals of both charge controllers to the positive and negative terminals of the battery bank, respectively, using the appropriate battery cables.
- Double-Check Connections: Once all the connections are made, double-check the wiring to ensure everything is properly connected and secure.
- Turn On Power: After confirming the correct wiring, turn on the power source and verify that the charge controllers are functioning correctly by monitoring the system’s voltage and current.
Connecting Two Charge Controllers to One Battery Bank

In some cases, you may want to connect two charge controllers to a single battery bank. This configuration is useful when you have a larger solar power system that requires additional charging capacity. Follow these steps to connect two charge controllers to one battery bank:
- Assess System Compatibility: Ensure that the charge controllers are compatible with each other and the battery bank. Check their voltage and current ratings to ensure they can handle the combined power output of the solar panels.
- Choose Wiring Configuration: Determine whether a parallel or series-parallel wiring configuration is suitable for your system. Consider your power requirements and the voltage and current ratings of the charge controllers and battery bank.
- Connect Charge Controllers: Connect the positive terminals of both charge controllers together and the negative terminals together, following the chosen wiring configuration.
- Connect Battery Bank: Connect the positive and negative terminals of the combined charge controller output to the positive and negative terminals of the battery bank, respectively.
- Monitor System Performance: Once the connections are made, monitor the system’s voltage and current to ensure both charge controllers are functioning correctly and delivering the expected power output.
By following these steps, you can successfully connect two charge controllers to one battery bank, increasing your solar power system’s charging capacity and overall efficiency.
Frequently Asked Questions
It is generally recommended to use identical charge controllers to ensure optimal performance and compatibility. However, if the charge controllers have similar voltage and current ratings, it may be possible to wire different types together. Consult the manufacturers’ guidelines and specifications for accurate information.
Wiring two charge controllers is beneficial when you want to expand the capacity of your solar power system. By combining the output of multiple charge controllers, you can increase the charging current and overall power output.
PWM charge controllers regulate the charging process by reducing the voltage supplied to the battery, resulting in a more straightforward and cost-effective design. MPPT charge controllers, on the other hand, utilize advanced algorithms to maximize power extraction from the solar panels, making them more efficient, especially in low-light conditions.
Yes, you can wire more than two charge controllers together, depending on the size and requirements of your solar power system. However, it is essential to ensure compatibility and proper configuration to maintain efficiency and performance.
If you are unsure about the wiring process or lack experience in solar power systems, it is recommended to consult a professional electrician or solar power installer. They can provide expert guidance and ensure a safe and efficient installation.
When working with electrical components, always prioritize safety. Turn off the power source, wear appropriate personal protective equipment, and follow the manufacturer’s instructions and safety guidelines. If you are unsure about any aspect of the wiring process, consult a professional.